Showing posts with label 3rd grade lesson plans. Show all posts

Wednesday, October 14, 2020

Henna Hands Project...

 the Elements of Art: Line


India Traditional Bridal Henna 

While body adornment dates back over 5,000 years, it's generally used today to express luck and happiness, and is often featured at ceremonial events like weddings and births. If you attend a traditional Indian wedding, henna will almost always be a part of the celebrations. Henna paste is made from a powder derived from the henna plant. It has been used for centuries as a natural dye for hair and nails as well. The temporary dye is now most  used as part of the Indian marriage celebration.


Photo Credit: Amit Dave/Reuters


To purchase these designs go to the ETSY shop of Eltendedero Crafts. 
She has some amazing things!
Click HERE 


Lesson 4. Design Hands

Step 1. Using a pencil, trace around your hand and part of your wrist and arm.


Step 2.  Turn our paper once to a different side. Using a pencil, trace around your hand and

part of your wrist and arm again. This hand will over-lap the first hand.


Step 3. Turn our paper once to a different side.Using a pencil, trace around your hand and part of your wrist and arm again. 

This hand will overlap the first two hands.


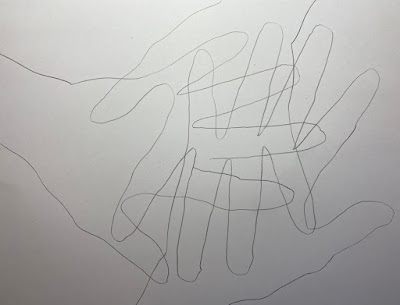
Step 4. Outline all your hands with a sharpie or black marker or pen. This may get confusing with all the overlapping 

hands so go slow and take your time.

.


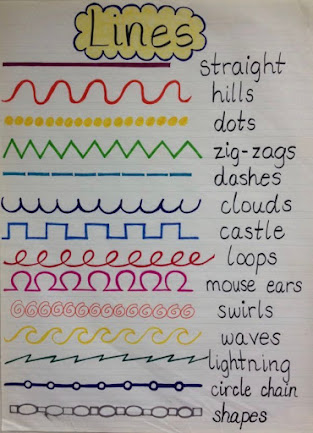
Step 5. Using a sharpie create the henna designs inside your hands. Remember that

when ever you come to a line you need to change your design.


Step 5. You will be using markers for this project. Pick out several markers for your color pallet. Your pallet can be either cool or....warm.


or warm...


Step 6. Pick your first color and make sever dots on the page.


Step 7. Now pick your next colors and continue circling the dot until all of the negative space is full. The negative space is anywhere the hands are not. 


Remember the hands will stay black and white, only the background has color.


Sunday, June 30, 2019

TP Cat Sculptures with 3rd Grade...


Start with an old thread spool. I got a box of 80 on Ebay for $50
This is day one of a 4 day process, however each step does not take the entire class.
You should have some back up work ready.

Dip the top of the cone in liquid glue.

I collected TP rolls from my 3rd grade parents.

Cut out a diamond shape space in the middle of the TP roll. 
I had to do this step for some of kids but most of them were able to handle it on their own and then help other.

Next set the TP roll on to of the cone with the glue. 


The last step for the day is to cut out and attach the ears.
I used a TP roll and cut triangles off the end.
The kids dipped the ears in glue that was on a foam tray and attached them to the top of the TP rolls on the cones.

 After gluing on the ears on the kids used a Sharpies to write their names and their
teacher's name inside the cone and place them on the rack.


I labeled each shelf with their teacher's name. 
This process took most the class (30 Mins). After their cat was on the rack they
got their art journals and started to work for the remainder of the class.

Day 2

Today we will paint on a single base coat color.

This is a fairly quick process, about 20 minutes. 
When they are finished painting they put their painted cats back on the rack and get out
any old or unfinished work. I also allow the faster finisher to help the more detailed workers get their cats painted.

Day 3


Designs and pattern painting...then back to the drying rack.
On the third day I start a new drawing project before they begin paining their details. 
After they get the instructions for the new project they may start their designs and patterns.
When they are finished they may start on the new project.
I would keep the new project fairly simple and manageable. 

Day 4

Eyes, tails and whiskers. 
First they add the white paint and then a black dot for the pupil.
Next they use pipe cleaners for the whiskers and really fluffy ones for the tail.

The kids pick out their colors for ones I have already cut down to size and then dip them in the glue.
Tail and whisker gluing is the last step. I have them lay their cats on wax paper on the table next to them to dry as they are working on last weeks drawing project. I walk around and grade the cats as they are drawing. 


Tails
You can buy these on Amazon HERE

Whiskers
You can buy the tiger striped pipe cleaners HERE on Amazon

I use craft glue for this projects. It holds well and seems to dry faster then regular liquid glue.
You can buy the tacky glue HERE on Amazon


This is our photo inspiration from Pinterest. I tried following the link but it was a dead end.


Friday, January 5, 2018

Painted Paper Color Wheel Forest...

3rd grade created a collage painted paper color wheel forest...

It was snowing in some of the forests.


Cutting, gluing, pasting.. all in a day's work in the elementary art room!

Layering up the forest.

My tables are arranged by color...Red, Orange, Yellow on one side (the warm side) and Green, Blue and Purple on the other (the cool side). To prep for this lesson each table painted 6 sheets of 12x18 90# white paper with different shades of the same color. The color they painted corresponded with their own table color. 
When the papers were finished they were all put on the drying rack for next week. If students finished early they could help other tables finish their paintings or work in their own art journals. 

The painting step of the lesson took almost the entire 45 min. class. You would think it would go faster since they are just randomly painting one color but NOOOOOO.... I do only have 4 kiddos at each table and they did have to paint 6 papers pre table so there you go. 
Do not have the kids put their names on the papers. This is so they will no try to claim them for their own in the next phase of this project.


In the next week's phase of this project I randomly handed out one color of each sheet to every table. So each table received a full color wheel. I also gave each table one sheet each of dark gray, light gray and white constructions paper.
The instructions were to create a color wheel forest. Students much have 3 snow capped mountains using the grays, a sun and some clouds. The style and manner of cutting was up to each student.


This is our inspiration piece for this project, it is from Painted Paper. Click HERE for the link.
Painted Paper is an amazing web site run by Laura Lohmann. Click HERE for her site.
I believe Laura created this as a mural with her kids.